

13 Custom Patterns for Installing Subway Tile
Subway tiles are a versatile accent that can be used for a variety of spaces, including kitchen or bathroom backsplashes, full walls, or even showers. There are many creative ways to lay the subway tile to create many unique patterns. You may think that tiles are all the same, but the comfort tone that you choose from the wide array of subway tile patterns will make this room really stand-out and showcase the beautiful accents you chose for your bathroom or kitchen design.
Custom subway tile patterns, like herringbone, chevron, and basket weave, are timeless patterns that can be used in any space around the house. It's extremely easy to install on your own if DIY is more your style and the installation process will not take long at all. You can also complement the simpler designs with a contracting color of the grout for the most dramatic effect.
You have a lot of options when it comes to backsplash. So, we've created this simple list to help you make an informed decision about the best design for your renovation:
1. Horizontal Brick Pattern
This subway tile pattern is the most traditional, but the beauty is in its simplicity. Many people chose tile and grout to complement each other or emphasize the color of the tile by going with the contrasting darker color. This pattern widens the space and is often used for the entire standing shower.

2. Vertical Brick Pattern
By positioning the subway tiles vertically, you can draw the eyes along the whole height of the space. If you have tall ceilings in the kitchen, this pattern can run all the way from the backsplash to the ceiling and create a nice background for floating shelves.

3. Diagonal Brick Pattern
You don’t see a lot of this pattern in DIY projects due to the intricate cuts you have to make when the tile pattern comes to the edge. However, it can make a great focal point.

4. Horizontal Offset Pattern
A spin on the classic brick design sometimes ignored, but we think it creates a variety and makes the subway tile a little more special. Make sure you measure it out and lay it out prior to setting the tile. This pattern allows you to use the smaller pieces on the edges and not have so many wasted pieces.

5. Vertical Offset Pattern
Same as horizontal offset pattern, this way of laying subway tile makes space distinctive. The best part if that you can control how much of an offset you would like to create. And remember vertical lines will always elongate the space visually.

6. Diagonal Offset Pattern
Just like with the brick pattern above, you can create all these three variations even diagonally. It creates a little bit of a challenge during installation of the subway tile, but with practice and proper tile cutting tools, you can achieve success.

7. Herringbone Tile Pattern
Herringbone patter is one of the popular ways to lay hardwood flooring, but it has been used for tile backsplash and even the whole shower many times. When putting the herringbone pattern on the wall, the tiles overlap and stack with the shorter end of the tile connecting with the longer end of the tile in the next row. Essentially, the tile creates a zig-zag line. The best part is that you don’t need to do a lot of cutting while laying this tile pattern until you get to the edges.

8. Chevron Tile Pattern
This design looks very similar to the previous herringbone pattern, however, the main difference is the subway tiles will have to be cut diagonally before you can create this pattern. If you have proper tools, you can quickly precut tiles using the same setting. Alternatively, you can buy the tiles that are cut specifically for this pattern. It eliminates the waste and might reduce the cost of the final project.
![]()
![]()
9. Double Herringbone Pattern
Just like with the traditional herringbone pattern, there is not much cutting involved, but you stack two tiles at a time. This pattern looks even more intricate if the tiles have some variations in color, like the natural marble tiles or porcelain tiles. Also, this will look great with longer subway tiles.

10. Horizontal Stacked Tile
Stacked designs are the easiest for any DYI tile installer. It requires very little experience and looks best for the entire space, whether you are doing the shower walls or the entire backsplash counter to the ceiling. The latest trends in tile are using this pattern for elongated tiles for the most dramatic effect. It will widen the space because the eyes naturally follow the grout lines between the tiles.

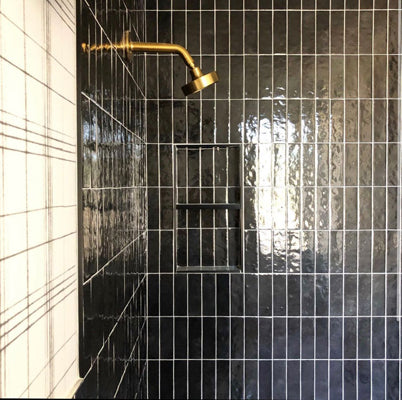
11. Vertical Stacked Tile Pattern
Like the horizontal pattern, vertical stacked tile pattern is also very trendy right now. Many designers use it to fill the space and raise the ceiling with it by making accent walls in smaller powder rooms as a backsplash.

12. Basket Weave Tile Pattern
Traditionally, basketweave tile pattern is created from precut mosaic tiles that come on a sheet with the variation of colors and the small piece of square tile that goes in the middle. However, you can create it from the simple subway tile by stacking two tiles horizontally and then stacking two tiles vertically. This pattern works best with 3x6 tile sizes and can be used for walls and floors.

13. Crosshatch Tile Pattern
This method of laying subway tile is similar to the basket weave, but it works with the longer tiles. You can stack 3-4 tiles in a row vertically and then stack the same amount of tiles horizontally, thus creating the cross hatch design. For more variation in your design, you can also incorporate the diagonal layout for your tiles.

As you can see subway tile patterns are available in many designs, can be used with different color tile and grout, as well as different thickness of the grout lines. You can use any of the above-mentioned patterns for the whole bathroom, or you can use a mix of several patterns to add some diversity.
Don't think you have to stick with white tiles. It's time to get creative - think beyond your basic subway tile backsplash and look at ways to freshen up your kitchen or bathroom.
Looking for the largest selection of first quality subway tiles? Check out all that Floorzz has to offer HERE!
Leave a comment